Kefka Palazzo
Final Fantasy 6
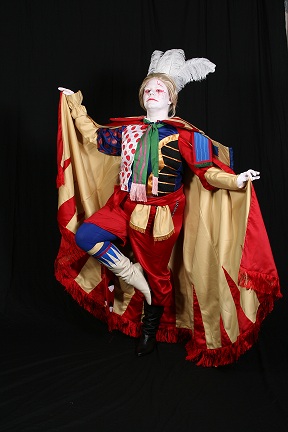
Wow. Where to start with this?
While playing Final Fantasy VI, I fell in love with the Clown Prince of Evil as he terrorized the heroes in the game. His callous disregard for life, nihilism, violent temper, lust for power and impeccable fashion sense all make him an excellent villian. The best part is that there's no real reason for him to be evil. He just is. These kinds of villians are sadly in short supply these days.
The other reason is that I believed this would be a great challenge for me to tackle. I could have made it easy on myself and done his sprite version, but my pride dictated that I had to implement the concept art drawn by Yoshitaka Amano. During the course of implementing this costume, I added elements from the recent Dissidia concept art, largely for aesthetics and the fact that Amano's artwork is rather inconsistent as far as details are concerned.
For something so complex, the patterns I needed were surprisingly simple. I used a Victorian jacket pattern for the shirt (along with Gosu Rori Vol. 7 for the lower right sleeve), a standard cape pattern for the cape (merely making the collar wider), and a Jedi-style pants pattern for the pants (cutting the right leg short).
Underneath the costume, I wear a pair of blue dancer's tights, compression vest and T-shirt to absorb sweat and make-up. I also wear a pair of white gloves for Kefka's white hands. The boots I found on eBay. On the left one, I glued a brocade ribbon. On the right, I blocked out the blue triangles with a thin Sharpie and went back over it with blue fabric paint, finishing it off with a scrap of red bias tape.
The pants pattern was largely unchanged. I cut the right leg short and added two strings of beads to the left side.
The shirt and cape required the most work. While the major pieces were simple enough to draft, I still had to make sure I cut them in the correct colors and spend hours on appliqué and hand-painting. The cape has a total of fourteen triangles appliquéd to the inside, along with about 5 feet of fringe bordering the bottom. The cape ties with scrap bias tape and a string of decorative beads.
The red polka-dots on the right front and right upper sleeve took five hours to execute. I used the pattern pieces to map out the dots and cut them out, making a handy stencil to lay on the fabric and attack with a bottle of fabric paint. The left front has a black appliqué that I free-handed, with ribbons layered on top of it. The right back has ribbon crisscrossing it every whichway.
The collar pattern was widened so that it would extend over my shoulders and stiffened with thick interfacing. After cutting the interfacing, I cut the pattern into 11 equal pieces and cut their individual colors. Then I sewed each piece together to create the trademark "jester" collar. I originally intended to add the collar to the cape, as was originally intended by the pattern. But the weight of the cape and collar caused it to slowly pull back and choke me, so I added it to the shirt to alleviate the issue.
The scarves proved a huge challenge. The leg, waist and neck scarves were easy enough. A few strips of fabric, some spare fringe and a combination of freehand and stenciled hand-painting gave me those. The hardest one was the red waist scarf, which required a little geometry knowledge to block out the circles and triangles.
The back scarves were another matter. How do I get these things to stand up without weighing me down? I realized that I still had a bunch of buckram from a prior commission. A little freehand sketching and I had the base pattern for my scarves. For the pink one, I freehanded the stripes and appliquéd them. The yellow was made in the same way, but the crowns were painted on. And the blue one was bordered in bias tape, with the narrow red and white stripes machine-embroidered. The green one has no buckram and is merely tacked on to the pink scarf and allowed to hang freely. The fringe on the yellow and blue scarves are short pile and stand up on their own. They are attached to the cape with large safety pins, which makes packing and transporting the costume easier, since I can lay them flat on the bottom of my suitcase.
The headdress is three ostrich feathers glued to a giant spring barrette, with a handful of giant wooden beads handsewn to the back. The makeup is Graftobian white clown base and Mehron red, set with baby powder.
The props I usually carry around are a small "poison" bottle and "magicite". The bottle was a random decorative bottle I found at Hobby Lobby and usually holds whatever I get my hands on (usually water or Kool-Aid). It comes in handy because it's thirsty work being the Clown Prince of Evil!
The magicite? I was wandering the garden section of Hobby Lobby and put my hand on a garden ornament. The glass ball-like top came off in my hand and looked just like magicite to me! I got a discount because the ornament was already broken and I said I just wanted the ball anyway! Aren't found objects awesome?
Total time for completion: 55 hours (clocked). Total sanity left after completion: None at all.
Model: Kat
Photo Credit: Frost Photography
Back to the Gallery...
$1,100 - 1,500